Monday, January 25, 2021

D&D Alternate Spell Progressions


Out of curiosity, I generated alternate spell progression tables for D&D BECMI magic-users and clerics. There were two reasons for looking into this. The first is that 1st level characters start with only one spell (or none at all in the case of the cleric), which a lot of players stumble upon. The other reason is that by-the-book first level parties are incredibly weak, and especially in the case of the magic-user, they don't contribute all that much to a game session, other than role-playing or pitching ideas. It's all rather limiting. Spellcasters should be in the business of casting spells.

Entirely optional, this approach is a radical departure from standard game mechanics. No one is obligated to follow it--I'm mentioning this for the cohort of folks who "disapprove" of new ideas to an old game or any sort of attempt to change their habits. What I post here is only for those with an open mind. 

There are plenty of house rules on boosting the numbers of spells 1st level adventurers can cast. Nothing wrong with this if that's the way you like it--it's your game. The alternate spell progressions sidestep borrowing game mechanics from other systems or fancy schemes tacked on existing rules. These tables also ensure that characters with lousy stats* still start with a good number of spells.

I had magic-users start out with 5 spells (1 Read Magic, 1 attack spell, 1 defense spell, 2 miscellaneous). The progression for first level spells ranges from there, gradually up to 9 across the board at 36 experience levels, as per official game mechanics. Spell levels above 1 are pretty much "by the book" in that they are earned at the correct experience levels.

(*) As regards "lousy stats:" I'm of the opinion that it is a lot more challenging to run PCs with low ability scores, and therefore the rewards ought to be greater than for those clad with 18s and 17s. I would also suggest reversing the experience bonus for high scores, rewarding low scores instead. With this in mind, the alternate spell progression tables make a lot more sense than giving extra spells for high intelligence or high wisdom attributes.

Clerics are a bit tougher to address since they're not straight-on spellcasters. Clerics have other advantages in D&D BECMI, such as armor and weapon choices, better combat abilities, better hit points, turning undead, etc. On the other hand, their spells are crucial to a party's survivability, as regards healing/reviving fallen heroes. D&D BECMI isn't designed to allow healing by means other than clerical spells or whatever magical potions might be purchased beforehand or gleaned in the course of an adventure. In practice, cleric spells often are the go-to solution for this, especially at low level. Yet, D&D BECMI has them starting with ZERO spell. Rather puzzling.

In their alternate spell progression, I did not want to give clerics as many spells as the magic-users. Zero wasn't an option, obviously. So I settled on just two at first level. I hummed and hawed about starting them with 3, but I erred on the conservative side here given all the cleric's benefits.

This approach changes the profile of regular games drastically since spellcasters have a lot more magic to throw around. On the other hand, earning spell levels 2+ is roughly the same as in official rules. These two tables do not alter spellcasting abilities all that much at higher levels either. At level 18+, the differences with official spell progressions are minimal, thankfully!

Let me know if you spot two identical rows in these charts. Thanks! For the elf's updated spell progression table, click here.  Have fun.

Art Credits: Hand of the Gods: Prescience by Eksafael

Tuesday, January 12, 2021

City Encounters

Medieval Street By Gycin on Deviantart
Medieval Street by Gycin on Deviantart

I've been asking around for a cool set of mechanics for random encounters in a city environment. I merged kibitzing from friends with my own ideas and came up with the following material (to be included in Calidar's upcoming CAL3 Gazetteer this year). Your thoughts are welcome. The actual descriptions of the encounters will be included in the book. This article only focuses on mechanics driving the frequency of encounters and their distribution across a city.
---ooOoo---

Odds of stumbling on someone or something vary with the time of the day and the city district. Encounter descriptions are as simple as possible, giving a general idea and leaving details for referees to develop according to the needs of their games.

When to Roll: Primary mechanics involve PCs moving along streets. Basic odds of random encounters are 10%, plus 10% each time an intersection is reached. Roll any time a new intersection is reached while adjusted odds exceed 50%. If a random encounter takes place, reset odds to 10%. This approach implies that encounters are more frequent in neighborhoods with many alleys and small building blocks such as Old Meru, than in districts featuring large blocks like Soul Tree. If a party lingers in one spot, wastes time in fruitless dithering, or attracts attention to themselves, roll on the random encounters table directly at a time that seems the most judicious.

As an option, odds of random encounters during night hours can be reduced to +5% per intersection (from +10% stated earlier). In other words random encounters are less frequent during night hours.

Time of Day: The time of an encounter influences who or what comes up. Mythuín’s busiest time runs between 10:00 am and 2:00 pm—roll on the following random encounters table without adjustments during that time. For every hour segment before 10:00 am or after 2:00 pm, adjust the roll +3. For example: An encounter taking place at midnight should incur a +30 modifier on the random encounters table.


Encounters: Encounters depend on which district they take place. [[Note from the Author: Details about the districts have been deleted from the blog entry. Essentially, the four categories can be summarized as upper-class, upper-middle class, lower-middle class, and lower class.]]

Encounters with monsters are listed in italics; all the others involve NPCs. Except for street patrols, use the next eligible entry to avoid duplicate results. Street patrols are listed multiple times for this reason. Encounter descriptions follow in alphabetical order.

Random
Encounters
City Districts (d%)

Soul Tree

Up Cliff

Down Cliff

Old Meru

Street Patrol

01-05

01-05

01-05

01-05

Matriarch

06-10

City Hall Official

11-15

Aristocrat

16-20

06-12

Merchant

21-25

13-19

06-11

Proselytizer

20-25

12-17

Cutpurse

26-30

26-32

18-24

06-12

Street Patrol

31-35

33-39

Beggar

40-46

25-30

13-19

Grifter

36-43

47-52

31-36

20-26

Pixie Punks

44-50

53-59

37-42

27-33

Doppelgänger

51-57

60-67

43-48

34-40

Lycanthrope

58-64

68-73

49-54

41-47

Street Patrol

65-70

55-60

Eye Agent

71-83

74-78

61-65

48-54

Foreign Spy

84-90

79-84

66-71

55-61

Acorn Activist(s)

91-95

85-90

72-77

62-68

Drunken Sailor(s)

78-83

69-75

Street Patrol

96-101

91-95

Forefathers Activist(s)

102-108

96-100

84-89

76-82

Shadows Thugs

109-113

101-105

90-96

83-89

Sword Activist(s)

114-118

106-110

97-100

90-94

Sewer Denizens

101-109

Vampire/Nosferatu

119-124

111-118

110-113

94-97

Band of Muggers

119-123

114-119

98-111

Night Snatchers

123-124

119-124

112-124

Street Patrol

125+

125+

125+

125+

Etc. Let me know if you stumble on any clunkers.


Saturday, December 12, 2020

City Design WIP: Part Three

About two weeks into the process, a more finalized look finally emerges for the bright and beautiful city of Mythuín. As the result of "real life," I spent anywhere from 2 to 9+ hours each day actually working on the map (no weekends for indie publishers, of course), so work hours are indeed piling up. So far, the computer has had no problem handling the growing file size.

For the previous article, click here.

Much of the effort aimed at developing outlying suburbs and natural-looking terrain. At this scale, it was a challenge. After a few scrapped attempts, I happily settled on textures for farmland, woods, and hills.

The image above shows the South Bridge district. The section north of the river isn't finished. The farmland pattern came from an aerial view of fields in England, roughened and slightly blurred. I rendered it in a partially transparent layer over a mottled green-brown texture. Both components are feathered to smoothen out their edges. The process is simple: 1. Select areas on the map, 2. Copy the textures from separate files, 3. Paste to fill the selected areas. Repeat for each layer.


The image above shows the west bank. The step following the placement of farmland addressed small rivers and pathways. A new layer farther down received a mottled brown texture akin to bare dirt. I then traced pathways and riverbeds through the farmland with an eraser tool to reveal the bare dirt on the lower layer. In between those two layers, I drew white lines within the riverbeds, and replaced them with a water texture. When done, the edges of the pathways and the river textures got feathered for a more natural look.


The next image displays parts of the old town, the seaport, and the so-called Tower Hill area. The old town, known as "Old Meru," marks the location of the original Meruín settlement, wedged between a natural cove and a hill. The Meruín are aquatic elves, so their dwelling and street design reflects "fluid" lines. I altered the initial coastline inside the port and added docks and wooden piers. The hill presented a challenge. I scrapped a few attempts before settling on the present look. There are five separate layers, starting with the basic green-brown mottled texture I used for farmland. I tweaked the brightness, contrast, and hue of the first three layers. The last two consist in a brown rocky texture. All these layers were heavily feathered and blended together for the final result.


The Skyport and its warehouses lie on the north side of town. I copied original skyship artwork from earlier projects and rescaled it. This shows how large the city truly is. Most of these skyships are about 30-35 yards long. Ideally I should alter the edges of the river, since its banks are masonry. There ought to be docking features here and there alongside the river. The top of the image also shows a forest texture. It's layered directly on top of farmland, feathered, and rendered partially translucent to better blend it into the image. I also knocked out the grid from the city center, for clarity.


A riverine port and shaft lock are adjacent to the skyport. I had some fun showing rougher waters past the bridge and the waterfall. A shadow hints at the position of the cliff bisecting the entire city. The north bank shows a small suburb at the end of the bridge, a nearby forested stretch, and marshes below the cliff. The edge of the riverine port will be altered to look more like docking facilities. 


Talking about scale: here's a bit more  on the subject. The 1mm = 11 meters indication refers to the scale on the printed map. 100 meters = approx. 110 yards for those of you unfamiliar with the metric system. I also included travel times for characters moving about the city.

That's it for today. Hope you enjoyed the tour!

Wednesday, December 2, 2020

City Design WIP: Part Two

 About a week ago, I started showing the process I follow to design a city (click here for Part One). As promised, here are the next few steps.

The biggest task consists in drawing streets and open spaces with white lines. You can already tell where main districts may be located.

The old town huddles next to a big hill, just south of the port area. A fortification stands on the hill, dominating the harbor and its entrance. Low and lower-middle-class neighborhoods lie east of the cliff's edge. West of the cliff is where middle and upper classes reside, with the wealthiest buildings and those housing the realm's government facilities closest to the giant tree. Two forested parks straddle the large waterfall at the city's center, each with a mausoleum in its middle. Suburbs, hamlets, some forests, and farmland will occupy the west and south river banks. Here's a closeup of the center area.


The next step takes all of 30 seconds, which consists in an automated command adding a thin black outline around the white lines showing the streets. Zap!

The key to all this work is to rely on different layers for most things. Moving right along, the next step knocks out the white color from the map. That's even faster than adding the outline. The intent is to remove anything that would mask the color and texture of the streets in the next stage. Zap #2.

Now comes the more exciting part: adding color and texture. A light, gray/beige, gritty texture will do fine for streets and open spaces. At this scale, showing a cobblestone pattern is absolutely futile. A neutral blue for the river and pool is easy enough. I added a bit of green here and there for gardens and inner courts. It's important to fill in colors and textures on layers beneath the one with the outlines. Since this is a raster image, trying to add color on the same level would make the black outlines look really ragged. Plan ahead. Make backup copies of previous versions in case you can't fix a problem spotted too late in the process. Some editing will correct small details, such as intersecting outlines that were not visible earlier beneath the white layers. And voilà!

Various colors will replace the buildings' boring gray background. These will serve as a color code to locate the city's various districts. I added thin black lines to delineate adjacent buildings within city blocks. Surely, you're getting the point by now. Definitely easier to look at with the extra bits too. A later step will add more detail such as bridges for sure, extra towers, trees, the harbor's breakwater, docks, piers, ships, boulders alongside the seawall, and so on. Given the size of the city, it'll take a while. Patience is key.

Friday, November 27, 2020

Black Friday Cyber Monday

Black Friday/Cyber Monday sales are in effect at DTRPG. #Calidar PDFs are heavily discounted for the duration. Don't miss this opportunity to complete your collection or discover this new world.

Click Here for Details


Thursday, November 26, 2020

City Design WIP: Part One

"Medieval Street" © 2016-2020 Aleksandr-osm on Deviantart

Designing a fantasy city always is a challenge. Other than using random city generators (some of them are fairly good and fun to use), drawing one’s own requires balancing creativity vs. desire for realism, both of which demand planning. The city described here, Mythuín, is a work in progress. I intend to include it in my upcoming gazetteer on Calidar’s elves. I hope to post updates between the early stages shown below and the final result.

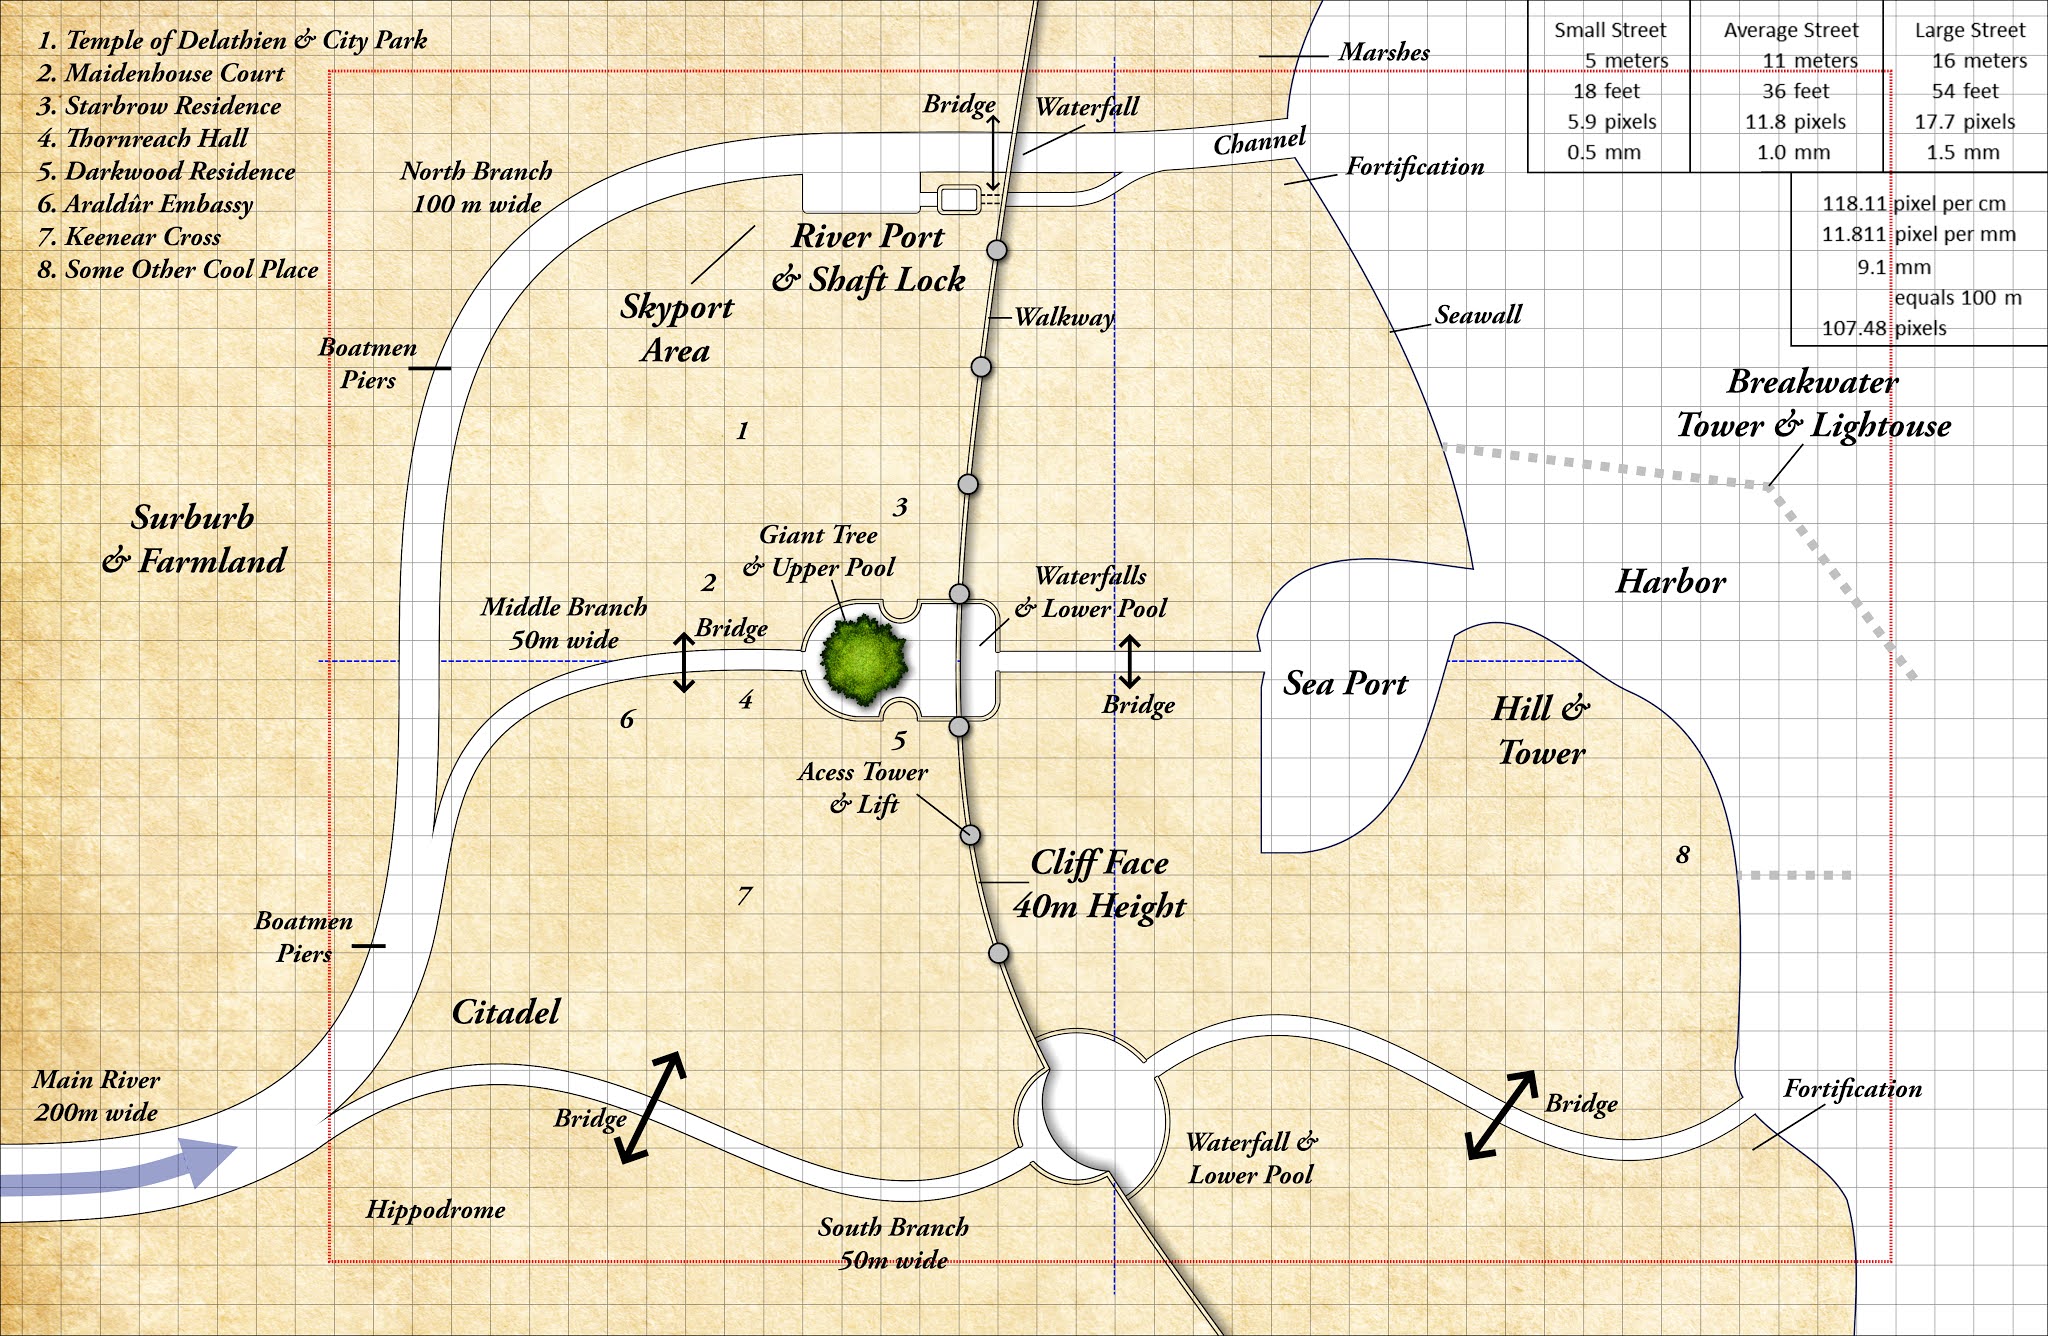
            The first step was to establish Mythuín’s physical size and therefore the scale of the map, and how big the streets would look on paper. After some back and forth with cartographer Thorfinn Tait, we went for a 1:11,000 scale. From this, he generated the coastline, based on the existing topographical map from cal1 In Stranger Skies. The next milestone was to figure out the size and graphic resolution of the map’s image, with one version intended as a two-page spread in the gazetteer and the other as an option for a separate 12”x18” fold up map. The red dotted line on the illustration shown below marks the outside limit of the book’s map. All in all, the area depicted is about 2 miles north to south (a little over 3 Km). The grid is set to 1 square = 100 meters (330 feet).

            From this, the widths of the streets could be calculated fairly accurately. For example: a “small” street could be thought as being 18 feet across (a little over 5 meters). On paper, this would be just 2 millimeters thick. I know this actually works, based on the Glorathon city map from cal1. Tracing such a street on a computer screen requires a line 6 pixels wide. Actually, it’s not really as narrow as one might think, so far as Middle Ages streets go. Those of you living in Europe or Asia know what I mean. I Google-viewed the old quarter of my home town of Nice, which is a good example of what a medieval town might look like. Some streets there are 10 feet across (3 meters). It’s great for shopping and ever so quaint to visit, but they do get pretty crowded. On the plus side, there’s no car traffic there. At the scale I’m using, these would show as simple lines, maybe dotted lines on the map.

Rough Draft 2 City of Mythuín ©2020 Bruce A. Heard. World of Calidar™ Fantasy Setting.
            Actually putting pen to paper begins at this point. Besides the existing coastline, I needed to draw the city’s main features. For Mythuín, I wanted a cliff with multiple waterfalls, and a giant oak tree in the middle. First, I drew the edge of the cliff. Then came a river splitting into three branches. The northern waterway is intended as navigable. It requires a river port and a shaft lock linking with a marine channel through a tunnel at the bottom of the cliff, 40 meters lower (130 feet). Two hand-drawn drafts and two computer versions later, I finally have a layout I can live with. I then added bridges and “access towers.” These large towers contain spiraling ramps for mounts and horse-drawn vehicles to reach either side of the city cliff. They also feature levitating shafts running along their central axes.

            With all this in place, I can begin “roughing in” streets and boulevards connecting all the key elements described earlier, which will produce city blocks and open areas. The map shown here is just an early draft with labeled details penciled in as guidelines. Click here for Part Two.

Nice's Old Quarter, Southern France